Web services expose operations of custom functions accessible
to applications through internet or intranet. Web services are interoperable,
reusable and follow strict standards and protocols to be followed for accessing
them.
SOAP (Simple Object Access
Protocol) is a specification for exchanging information between application and
Web Service. Web service request and response are encoded in XML format.
This blog is to provide
step-by-step instruction on invoking a web service through Datastage.
At the high level, following are
the steps to be followed.
- Identify and Save Web Service Definition
- Import Web Service Definition
- Configure Web Service Operation
- Configure Web Service Request
- Configure Web Service Response
Identify and Save Web Service Definition
Many web services are publicly
available for free. In this example, let us try to access Country web service published
through webservicex site.
Open URL http://www.webservicex.net/WS/WSDetails.aspx?WSID=17&CATID=7
in a web browser.
WSDL
definition is listed on the XML frame.
If you
are using Firefox,
Right click on WSDL definition frame
Select “This Frame” option from popup menu
Select “Save frame as” option to locally save the file

If you
are using Internet Explorer
Click on WSDL definition frame
Select File Menu and Click Save As
option to save the file locally
Import Web Service Definition
This step
will help to import the WSDL file saved in previous step into Datastage
- Login to Datastage Designer
- Select Web Service Function Definitions in “Import” menu.

- It opens Web Services browser which lists all the definitions already available on the Datastage project
- Click on “Metadata Importer” option

- Click on “Open File” option and select the location of WSDL file saved earlier

- Web service explorer will lists the available web service operations
- Right click one of the service operation and select Import all operations

Configure Web Service Operation
Next step
is to create a Server Job to access “Country” Web Service through Web Services Client
Stage.
- Login to Datastage Designer and Create a new Server Job
- From Palette, Select Web Services Client from Real Time group
- Place a sequential file stage as output

- Open Web Services Client stage properties
- Click on “Select Web Service Operation”
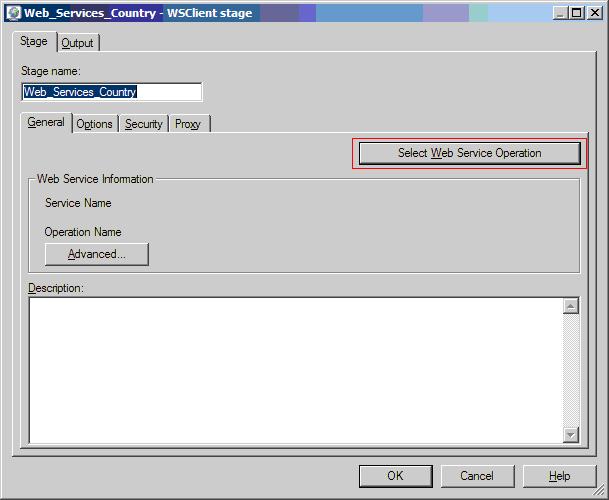
- Click on “Select Web Service Operation”
- Select “GetCountries” option. This web services does not have any input argument to be passed and hence Web Services Client stage is used for data retrieval.

- Select “GetCountries” option and click on “Select this item” link
- Enable HTTP/HTTPS option
- Supply user name and password for accessing internet
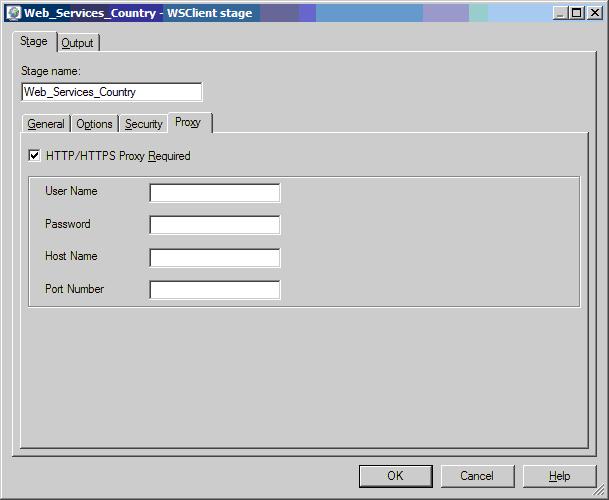
- Specify proxy host name (without http). If host name and port details are not known, its a general practice to contact Datastage Administrator to obtain such information.
If Datastage sever and Datastage client machine are directed through same internet proxy, these details can be extracted using the steps below. However, this is not recommended and demonstrated here for test purpose only.
Open Control Panel, Internet Options.
Select LAN Settings from Connections tab

Open the
URL specified in LAN settings on a web browser
Host name
and port details are generally specified at the “return” statement in
configuration script. Supply this information in Web Services Client stage.
NOTE:
- This would work only when the server is already rightly configured for internet access through proxy
- Include the server details in Web Client Stage excluding the file name
Configure Web Service Request
Open Web Services Client stage, Output tab
Open Input Arguments tab
Click on “Load Arguments Information” button. This loads
namespace definitions into canvas

Configure Web Service Response
Open Web Services Client stage, Output tab
Open Output Message tab
Click on “Load Arguments Information” button. This loads output
namespace definitions into canvas

Open
Columns tab and check whether output column is populated

Save,
Compile and Run the job

Output
file should have contents similar to the following

References
IBM Web
Services Pack Guide
Good work. Clearly mentioned the steps. Thank you.
ReplyDeleteHi anantha, Under Proxy settings, what is Host Name & Port Number. I am assuming Host Name is webservicex.net. Is this correct or please let me know where to get the Host Name & Port Number.
ReplyDeleteThank you
Thanks for the info
ReplyDeleteHI , I tried all the steps, but I am not getting data into output file. I am getting 0 records
ReplyDeleteHey I am getting errors like
ReplyDeleteWeb_Services_Client_0,0: Failure during execution of operator logic.
Web_Services_Client_0,0: Fatal Error: Fatal: ASCL-DSJNI-00005`:`TJClient::initialize: unable to create Java Virtual Machine; classpath = java/lib/wsclient.jar
java/lib/axis.jar
java/lib/commons-discovery.jar
java/lib/commons-logging.jar
java/lib/jaxrpc.jar
java/lib/saaj.jar
java/lib/wsdl4j.jar
java/lib/wss4j-1.6.18.jar
java/lib/xmlsec-1.4.2.jar
node_node1: Player 1 terminated unexpectedly.
main_program: APT_PMsectionLeader(1, node1), player 1 - Unexpected exit status 1.
main_program: APT_PMsectionLeader(2, node2), player 1 - Unexpected exit status -1.
main_program: Step execution finished with status = FAILED.
Please let me know what is needed to get this job done
Thank you in advance.
Hi Avinash Kotina,
DeleteBefore Integrating WebService you need to configure .Please follow below instructions.
Step 1: Setup User defined environment variables in Data Stage Administrator.
DATASTAGE_JRE=C:\IBM\InformationServer\_jvm\jre
DATASTAGE_JVM=bin\j9vm
DSHOME=C: \IBM\InformationServer\Server\DSEngine
Step 2: Add DSHOME path in System Environment path. i.e
Right Click on My Computer --> Properties --> Advanced System Settings --> Environment Variables --> System Variables
DSHOME= "C:\IBM\InformationServer\Server\DSEngine"
Step 3: In Job Properties import environment variable
Open job --> Job Properties --> Parameters --> Add Environment variable --> User Defind variables
Select these 3 variables
DATASTAGE_JRE
DATASTAGE_JVM
DSHOME
Hey Ram,
DeleteThank you man. Bit late but this was effective.
Thanks for your information.
This comment has been removed by the author.
ReplyDeleteThis comment has been removed by the author.
ReplyDeleteThis comment has been removed by the author.
ReplyDeleteThis comment has been removed by the author.
ReplyDeleteThis comment has been removed by the author.
ReplyDeleteThis comment has been removed by the author.
ReplyDeleteThis comment has been removed by the author.
ReplyDeleteThis comment has been removed by the author.
ReplyDeleteThis comment has been removed by the author.
ReplyDeleteتصميم المواقع أفضل الممارسات التي يقوم بها أصحاب الأعمال اليوم يمكنك الأن
ReplyDeleteتصميم مواقع
تصميم متجر الكتروني